
Overhang Problems in 3D Printing: Causes, Limits, and Proven Fixes That Actually Work?
Are drooping prints ruining your large-scale projects? Wasting time and material hurts your business. We will show you how to fix these overhang problems for good.
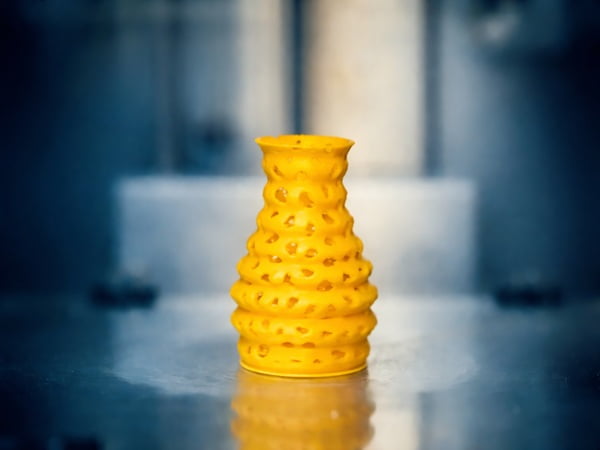
Overhang problems happen when a 3D printer extrudes material over thin air1 without enough support underneath. You can fix this by adjusting cooling settings2, optimizing part orientation, or using proper support structures3. This ensures clean, accurate parts every time you print.
Let us look at why these overhang failures happen and how you can stop them from ruining your next big project.
Why Overhang Failures Are One of the Most Common 3D Printing Problems?
Frustrated by messy plastic loops under your parts? This ruins part strength and wastes expensive material. Let us explore why this happens so often.
Overhang failures are common because gravity acts on hot, soft plastic4 before it can cool and harden. When printing large industrial parts, this gravity effect multiplies. This makes overhangs a constant challenge for engineers and machine operators everywhere.
The Physics Behind the Failure
At CHENcan CNC5, we have over 27 years of industry experience. We know that in large-scale printing operations, an overhang is a physical limit problem. It is not just a software glitch. Gravity never stops pulling down. When you push hot plastic out of a nozzle, it needs time to become solid. If there is nothing under it, it falls.
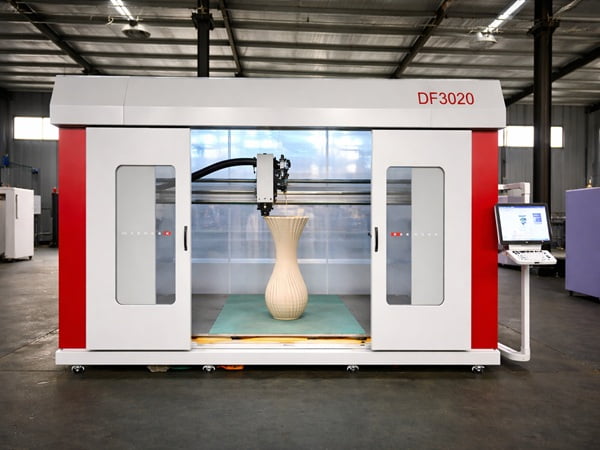
When we build our Industry 3D Printers for pellet materials6, we see this clearly. The true solution requires engineering thinking. You cannot just blindly add supports. You must balance geometry design, process control, and the scale effect7. Large parts hold heat longer. This heat makes the plastic stay soft longer, which makes the overhang drop faster.
| Factor | Small Scale Print | Large Scale Print |
|---|---|---|
| Heat Loss | Fast | Very Slow |
| Gravity Effect | Minimal | Severe |
| Material Weight | Light | Heavy |
Understanding this scale effect is the first step. You have to treat the overhang as an engineering puzzle. You must control the heat and the shape at the same time. This is how we help our clients in the automotive and aerospace industries succeed.
What Really Happens When a 3D Printer Prints an Overhang?
Do you wonder why your prints look like spaghetti? Gravity pulls the hot plastic down before it sets. Here is what happens right at the nozzle.
When a printer prints an overhang, the nozzle pushes hot material out with only partial support from the layer below. If the plastic does not freeze quickly, it sags downward. This creates a rough surface or a complete print failure.
The Layer by Layer Process
To fix the problem, I always look closely at the print process. Imagine stacking bricks. If you slide the top brick too far off the edge of the bottom brick, it falls. A 3D printer does the same thing with melted plastic.
Each new layer must overlap with the layer under it. If the overlap is too small, the new layer has nothing to hold onto. The hot material just hangs in the air. The internal stress of the plastic also plays a role. As the plastic cools, it wants to shrink.
| Process Stage | What Happens | Result if Uncontrolled |
|---|---|---|
| Extrusion | Hot plastic leaves nozzle | Material flows too fast |
| Placement | Plastic rests on edge | Plastic slips off edge |
| Cooling | Plastic changes to solid | Plastic shrinks and warps |
Process control is key here. You need the right speed and the right temperature. If you push too much material, the weight pulls it down. If you print too fast, the plastic stretches and breaks. Good process control stops these issues before they start.
The 45-Degree Rule: Where It Comes From and Why It’s Often Wrong?
Still sticking strictly to the 45-degree rule8? You might be adding useless supports and wasting time. Let us rethink this old rule right now.
The 45-degree rule suggests that any angle past 45 degrees needs support. However, this is often wrong today. Modern cooling systems and advanced materials allow many machines to print up to 60 or even 70 degrees without any extra support.
Breaking the Old Rules
For years, people told engineers to never print past 45 degrees. This rule started when 3D printers had weak cooling fans and basic materials. Today, things are different. We design our Industry 3D Printers with strong cooling and precise extrusion.
I always tell my clients that the 45-degree rule is just a safe guess. It is not a physical law. If you have good process control, you can push past this limit. Thick layer heights make the 45-degree angle harder to print. Thin layer heights make it much easier.
| Angle | Old Rule Suggestion | Modern Machine Reality |
|---|---|---|
| 30 Degrees | Safe | Safe |
| 45 Degrees | Needs Support | Very Safe |
| 60 Degrees | Fails | Possible with good cooling |
You must test your own machine. We build customized CNC solutions and 3D printers for clients in 70 countries. Every material and machine combination acts differently. Do not let an old rule force you to waste material on supports you do not need.
Drooping vs. Curling9: How to Identify Your Overhang Failure Type?
Are your print edges curling up or sagging down? Mixing up these two problems leads to the wrong fixes. Learn to spot the difference quickly.
Drooping happens when gravity pulls hot plastic down due to a lack of support. Curling happens when plastic cools too fast and shrinks, pulling the edges upward. Identifying the correct issue helps you change the right settings in your software.
Reading the Signs of Failure
You cannot fix a problem if you do not know what it is. I see many operators confuse drooping and curling. This leads to endless frustration. Drooping looks like loose strings hanging under your part. It means the plastic stayed hot for too long.
Curling looks like the corners of your part are pointing to the sky. The nozzle might even hit these hard corners on the next pass. Curling means the temperature changed too fast. The top of the plastic cooled quicker than the bottom, causing it to bend up.
| Problem | Visual Sign | Main Cause |
|---|---|---|
| Drooping | Hanging strings | Poor cooling, high heat |
| Curling | Edges point up | Uneven cooling, shrinking |
Fixing these requires different actions. For drooping, you need more cooling and less heat. For curling, you need to slow down the cooling or change the print speed. Careful process control is the only way to balance these two extremes perfectly.
How to Find Your Printer’s True Overhang Limit (Step-by-Step Test)?
Guessing your machine limits? This leads to failed prints and lost money. You need a reliable way to test your exact equipment today.
You can find your printer's true overhang limit by printing an overhang test model10. This small part features angles from 10 to 80 degrees. You inspect the finished print to see exactly where the surface quality starts to drop.
Testing Your Equipment
Every machine has a breaking point. To find it, you must run a physical test. I always start new projects by printing an overhang gauge. This is a small file you can download for free. It prints arms at different angles.
Here is how I do it. First, load your normal material and use your standard settings. Second, print the test model. Third, look closely at the bottom of the angled arms. Find the angle where the plastic starts to look rough or stringy.
| Step | Action | Purpose |
|---|---|---|
| 1 | Print test model | Create a baseline |
| 2 | Inspect bottom surface | Find the failure point |
| 3 | Record the angle | Know your safe limit |
If the arms look bad at 55 degrees, then 50 degrees is your safe limit. We use high-end laser testing devices to ensure our CNC and 3D printing equipment is accurate. You must also test your limits to keep full-process quality control.
How Cooling, Filament, and Hardware Define Overhang Performance?
Are your overhangs still failing despite good settings? Your hardware might be holding you back. Discover how your setup changes your results.
Cooling fans freeze the plastic fast. The type of filament changes how quickly it melts and sets. High-quality hardware gives you better control over these factors. Good hardware allows you to print steep overhangs cleanly and quickly.
The Role of Your Setup
Your machine parts matter just as much as your software settings. At CHENcan CNC, we focus heavily on hardware design. A weak fan will not push enough air to freeze the plastic. If the plastic stays soft, gravity wins.
Filament type is also huge. Materials like PLA cool fast and hold their shape well. Materials like ABS hold heat longer and tend to warp or curl on overhangs. Large pellet materials used in our Industry 3D Printers hold massive amounts of heat. This makes the scale effect very strong.
| Element | Impact on Overhangs | Best Practice |
|---|---|---|
| Cooling Fan | Freezes plastic in place | Use strong, directed airflow |
| Material Type | Decides melting behavior | Match material to part needs |
| Extruder | Controls flow rate | Maintain steady, even pressure |
You need strong manufacturing capabilities to build parts that last. If your hardware is cheap or broken, no software trick will save your overhangs. Good hardware makes process control possible and easy.
Slicer Settings11 That Directly Improve Overhang Quality?
Tired of messy prints even with a good machine? Your software settings might be wrong. A few simple clicks can fix this problem.
You can improve overhang quality by lowering your print speed, increasing cooling fan speed, and adjusting layer height. Thinner layers give the next layer more surface to grab onto. These simple slicer changes greatly reduce sagging and improve surface finish.
Tuning Your Software
Software settings act as the brain of your machine. If you give bad instructions, you get bad parts. I always start by slowing down the print speed on outer walls. Slower speed gives the cooling fan more time to blow cold air on the hot plastic.
Next, I look at layer height. A smaller layer height means the nozzle steps out less for each new layer. This gives the hot plastic a bigger base to rest on. It is simple math, but it works perfectly.
| Slicer Setting | Adjustment | Effect on Overhang |
|---|---|---|
| Print Speed | Decrease | Gives more time to cool |
| Fan Speed | Increase | Freezes plastic faster |
| Layer Height | Decrease | Increases layer overlap |
Finally, check your extrusion multiplier or flow rate. Pushing too much plastic makes the overhang heavy. A heavy overhang sags faster. Careful tuning of these settings gives you the process control needed to beat the physical limits of the material.
When Supports Are Necessary—and When They Are a Mistake?
Do you put supports everywhere? This wastes huge amounts of time and material. Learn when you actually need them and when to stop.
Supports are necessary for flat 90-degree bridges or very heavy floating parts. They are a mistake when your machine can handle the angle naturally. Blindly adding supports wastes material, increases print time, and leaves ugly marks on your final part.
The Engineering Mindset on Supports
As I mentioned before, blindly adding supports is not the true answer. It is a lazy fix. In large-scale industrial manufacturing, supports cost real money. They use up expensive material. They add hours to the print time. They also require workers to clean the part after it finishes.
I tell my engineers to use supports only when physics demands it. If a part prints over thin air at a flat 90-degree angle, you must use a support. Gravity will destroy it otherwise.
| Situation | Support Needed? | Reason |
|---|---|---|
| 45-Degree Angle | No | Machine can handle it |
| 90-Degree Flat Bridge | Yes | No base under the plastic |
| Small Detail Feature | Maybe | Depends on cooling speed |
However, if the angle is gentle, let the machine do the work. Engineering thinking means finding the best way to make the part with the least waste. We focus on process control and smart design to avoid useless supports.
How to Design or Orient Parts to Eliminate Overhang Problems?
Hate removing supports? Poor part placement causes extra work. You can solve overhang problems before you even start the machine.
You can eliminate overhang problems by rotating your part flat on the build plate or adding chamfers instead of round fillets. Smart design and orientation remove the need for supports entirely. This speeds up your production and saves material costs.
Smart Geometry Design12
The best way to fix an overhang is to remove it completely. This is where geometry design meets process control. Before I slice a file, I look at how it sits on the build plate. Can I lay it flat? Rotating a part by 90 degrees can turn a bad overhang into a safe vertical wall.
If I am designing the part from scratch, I avoid round fillets under ledges. Round shapes create changing angles that printers hate. Instead, I use straight chamfers. A 45-degree chamfer is strong and prints perfectly every time.
| Design Choice | Printing Result | Better Alternative |
|---|---|---|
| Flat Bottom in Air | Needs heavy support | Touch the build plate |
| Round Fillet Underneath | Sags at the bottom curve | Use a straight chamfer |
| Complex Angles | Fails often | Split part into two pieces |
Sometimes, the smartest choice is to split a complex part into two simple parts. You print them flat and join them later. This engineering mindset saves time and gives you much stronger parts for industries like aerospace and shipbuilding.
Can Any 3D Printing Technology Print Perfect Overhangs?
Looking for a magic machine that ignores gravity? Every method has limits. Let us see how different technologies handle the overhang challenge.
No single 3D printing technology can print perfect overhangs without limits. However, methods like SLS use powder to support parts naturally. Multi-axis systems, like our 5-axis machines, tilt the tool head to turn an overhang into a flat print.
Pushing Technology Limits
People often ask me if there is a perfect 3D printer. The answer is no. Standard FDM printers will always fight gravity. But other technologies solve the problem differently. SLS printers use a bed of powder. The un-melted powder acts as a perfect support for the melted parts.
At CHENcan CNC, we build 5-Axis Machining Centers and Multi-turn Machining Centers. This multi-axis idea is moving into 3D printing too. If a machine has 5 axes, it can tilt the print bed or the tool head.
| Technology | Overhang Handling | Limitation |
|---|---|---|
| Standard FDM | Fights gravity | Needs supports or good cooling |
| Powder Bed (SLS) | Powder supports part | High equipment cost |
| 5-Axis Printing | Tilts to print flat | Complex software needed |
By tilting the part, a 5-axis printer changes an overhang into a flat surface. Gravity works with the printer, not against it. This is the ultimate mix of geometry design and machine capability. Until 5-axis printing is everywhere, we must rely on our engineering skills to win.
Conclusion
Overhang problems test your engineering skills. By balancing geometry design, process control, and machine scale, you can beat gravity and create perfect industrial parts without blindly adding supports.
Understanding this process helps you grasp why overhangs fail and how to prevent it in your projects. ↩
Proper cooling settings are crucial for preventing overhang failures and ensuring high-quality prints. ↩
Learn how to effectively use support structures to prevent drooping and ensure clean prints. ↩
Understanding gravity's impact on 3D printing helps in designing better support strategies. ↩
Learn about CHENcan CNC's expertise and solutions in overcoming 3D printing challenges. ↩
Discover how these printers handle overhangs and their advantages in industrial applications. ↩
Balancing these factors is key to overcoming overhang challenges in large-scale 3D printing. ↩
Learn why the 45-degree rule may be outdated and how modern machines can exceed it. ↩
Identifying these issues correctly is crucial for applying the right fixes and improving print quality. ↩
Testing your printer's limits with an overhang model helps prevent failed prints and wasted material. ↩
Adjusting slicer settings can drastically improve overhang quality and reduce print failures. ↩
Smart geometry design can prevent overhang issues and enhance the overall quality of prints. ↩